← Video Library · AI Design
From Mascot to Merch: The Character Spec That Keeps Your AI Mascot On-Model on Every Product
By Darby Rollins · Published November 17, 2026
Key takeaways
- The path is mascot, character spec, POD Studio, on-brand products. The spec is the engine that makes the last step possible.
- A mascot is a spec, not a prompt. Four short rules decide whether a design is your character or a lookalike.
- Seven plates make the spec: one master front you upload, and six that keep everyone, human or AI, honest about it.
- Upload only the clean master front as your reference. Sheets with measurements teach the model to draw the measurements.
- Measure, don't assert. The size floors come from a real downsample test, not from what looks right in Figma.
- One copyable prompt builds the whole spec with you in Claude Code, starting from a single image of your character.
- The same prompt and the same steps worked on a very different character, an original armored villain called OSK, with its own four rules.
- Once the spec exists, your AI works two ways: on-model designs through Ideogram's MCP, and mockups and print prep inside POD Studio, by you or by Claude in your browser.
Watch the video first, then use this page. This is the companion guide to my Ideogram POD Studio video, and it’s the free guide I promised in it. The video shows the run. This page holds everything in it, ready to copy.
In one morning, RIFF, my AI chief of staff, went from a single character image to a tee, a dad hat, a sticker sheet and a poster. All four stayed recognizably RIFF. That didn’t happen because of a clever prompt. It happened because RIFF has a character spec: a short set of rules and seven reference plates that settle what he looks like before any image model gets a vote. Take that same spec into POD Studio and you can build merch around your mascot, and the mascot comes out the same every single time.
Everything RIFF’s spec is made of is on this page, along with the one prompt that builds yours. Nothing is gated and nothing is for sale.
The path: mascot to merch
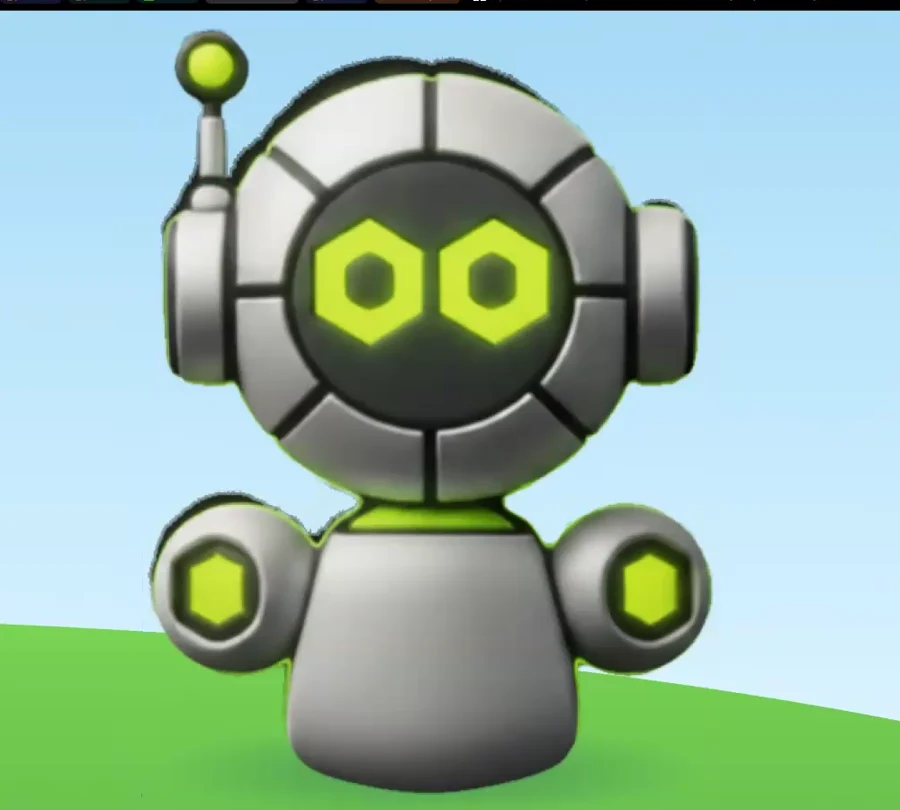
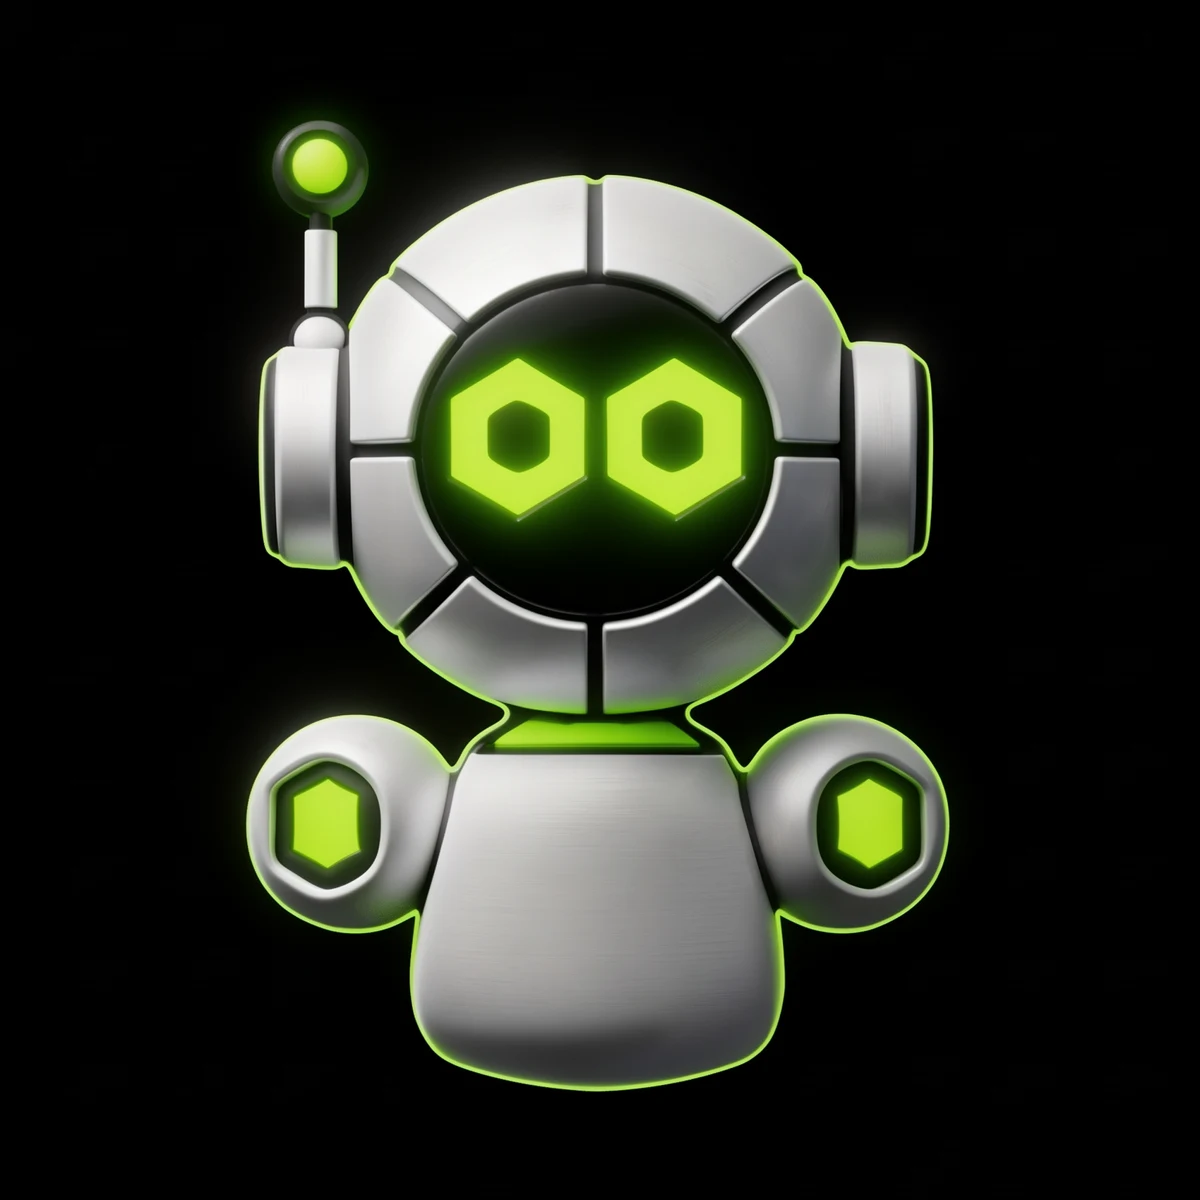
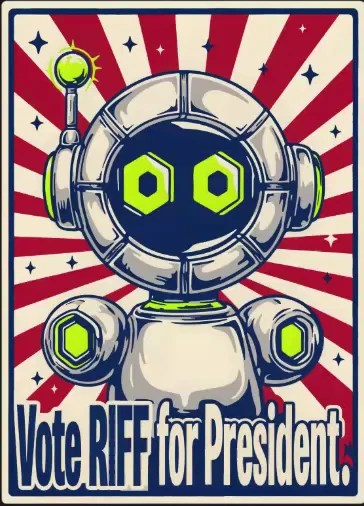
The spec is the core of this guide. POD Studio is the use case from the video, where the spec gets put to work.
What this costs you: one clean image of your character to start, about an hour with Claude Code for the full spec, and a few minutes per product after that.
This guide goes with a video sponsored by Ideogram, who gave me early access to POD Studio. The spec method itself works with any image model.
Start here: hand this page to your AI
You can read all of this yourself, or you can paste the block below into Claude Code and let it run the guide with you.
Read https://www.genaiuniversity.com/blog/character-spec-guide end to end,
then build my character spec with me.

In this order:

1. Tell me in five lines what we are about to build and what I will have at
   the end.
2. Ask me for the one image of my character I want to start from, and the
   folder to work in. Do not start until you have both.
3. Run the character spec prompt from that page, in full, as written. You
   are the conductor. I answer and approve.

While you do it: confirm before writing any file, never overwrite my
original image, never spend image-generation credits without telling me
first, and if the page and my setup disagree, stop and ask me.

Start with step 1.
If you’d rather skip the article, the prompt on its own lives at genaiuniversity.com/prompts/character-spec.txt as plain text. It’s the same prompt this page carries further down, served from the article itself so the two never drift apart.
Set up in ten minutes
Three things to have in place before you paste the prompt: Claude Code installed, Ideogram connected so Claude can make the images, and an empty folder with your character in it. Every block below has a copy button.
1. Install Claude Code
You need a Claude subscription (Pro or higher) or a Claude Console account. On Mac, Linux or WSL:
curl -fsSL https://claude.ai/install.sh | bashOn Windows, in PowerShell:
irm https://claude.ai/install.ps1 | iexHomebrew and WinGet installs are in the Claude Code quickstart.
2. Connect Ideogram
Phases 2, 3 and 5 of the prompt generate images, and this is how Claude does that for you. (Mockups and print prep happen later in the POD Studio web app, by you or by Claude in your browser. The MCP doesn’t run those yet.) Ideogram’s official MCP server lives at https://mcp.ideogram.ai/mcp. You sign in with your Ideogram account the first time, and anything Claude generates uses the credits on your Ideogram plan, the same as the web app. If you’d rather skip this, Claude will write the image prompts and you can run them in any image tool yourself.
In Claude Code, run this once in your terminal:
claude mcp add ideogram --transport http https://mcp.ideogram.ai/mcpThen start Claude Code. The first time it uses Ideogram, a browser window opens so you can sign in. If it doesn’t, type /mcp inside Claude Code and choose ideogram.
In the Claude app or on claude.ai, as a custom connector:
- Open Customize, then Connectors.
- Click + Add, then Add custom connector.
- Name it
Ideogramand paste the server URL:
https://mcp.ideogram.ai/mcp- Click Add, then Connect, and sign in with your Ideogram account.
On a Team or Enterprise plan, an owner has to add the connector first, and then you connect to it yourself.
Check that it worked. Paste this into Claude:
List the Ideogram tools you can use right now, one line each.If you see generate, edit and upload tools, you’re connected. Ideogram’s MCP page has the setup for ChatGPT, Cursor and other clients.
3. Make the folder
An empty folder, your character image inside it, and Claude Code started in that folder. On Mac or Linux:
mkdir my-character-spec
cd my-character-spec
cp ~/Downloads/my-character.png .
claude
On Windows, make the folder in File Explorer, drop the image in, then open a terminal in that folder (type cmd in the address bar) and run claude.
4. Paste the prompt
Copy the prompt below and paste it into Claude Code. It asks before it writes any file, and it stops after every phase for your “go”. Expect about an hour end to end. If you stop halfway, start Claude Code in the same folder later and say: Read SPEC.md and carry on from where we stopped.
The spec at a glance
A character spec is seven plates and four rules. Here is RIFF’s, plate by plate.
| Plate | What it settles | Who uses it |
|---|---|---|
| 1. Master front | The one canonical image. Every other plate derives from it. | The image model, as your only reference upload |
| 2. Four-view turnaround | Front, left, back, right on one ground line | You, when a design turns his head |
| 3. Dimensioned orthographic | Exact proportions, drawn from measured numbers | You and your AI, when something looks “off” |
| 4. Expressions + size proof | The canonical faces, and how small he still reads | Stickers, emoji, favicons |
| 5. Decision sheet | Ambiguous calls, settled once and dated | Anyone tempted to reopen them |
| 6. Key dimensions | Proportions in scale-free units | Any size, any product |
| 7. Size floors | The smallest size each crop survives, tested | Hats, pins, avatars, print |
Here is what lands in your folder when the prompt finishes:
my-character-spec/
  SPEC.md          the rules, palette, character block, settled calls
  PRODUCTS.md      one ready-to-paste prompt per product
  plates/
    01_master_front.png
    02_turnaround.png
    03_orthographic.png
    04_expressions.png
    05_decision_sheet.png
    06_key_dimensions.png
07_size_floors.pngAnd the four rules, which matter more than any plate:
Steal this check and paste it under any image prompt, with your own four rules in place of RIFF’s:
ON-MODEL CHECK. For every result, say PASS or FAIL and why:
1. Exactly two hexagon eyes. Never circles, never three.
2. One antenna, on the viewer's left, with one lime bulb.
3. Lime only where he glows: eyes, collar, hand-pod insets. Light, not paint.
4. No legs. Bell-shaped body, floating hand-pods.
Every design gets checked against those four out loud. Break one and it’s a different robot. That check is what turns “it looks kind of like him” into a pass or a miss.
Why a mascot needs a spec
Image models are excellent at a look and unreliable about identity. Ask for “a friendly chrome robot with green eyes” four times and you get four friendly chrome robots, not one character. The model fills every gap you leave with its own average, and the average is nobody’s mascot.
A spec closes the gaps before the model sees them. It does three jobs:
- It names what never changes. RIFF’s eye shape, antenna side and color rule are fixed. His pose, setting and product are free. Knowing which is which is most of the battle.
- It gives the model one clean reference. Not a mood board, and not ten past outputs that each drifted a little. One master image.
- It gives you a check. Four rules you can say in five seconds. Without them, you judge by gut, and your gut gets used to drift.
The spec is also what makes the AI half possible. A spec is plain text and images in a folder, so your AI can read it and apply the same rules you do. More on that at the end.
The seven plates
1. The master front
This is the only image you ever upload as a reference. It’s front-on, evenly lit, on a plain background, with nothing else in frame: no text, no measurements, no props.
RIFF’s started as a clunky first image and got cleaned up into this one. Yours can start the same way. Pick the best image you have, then refine it until every one of your rules is visible in it.
Never edit the master by hand after you lock it. If it has to change, make a new version and re-derive everything else from it. One source of truth.
2. The four-view turnaround
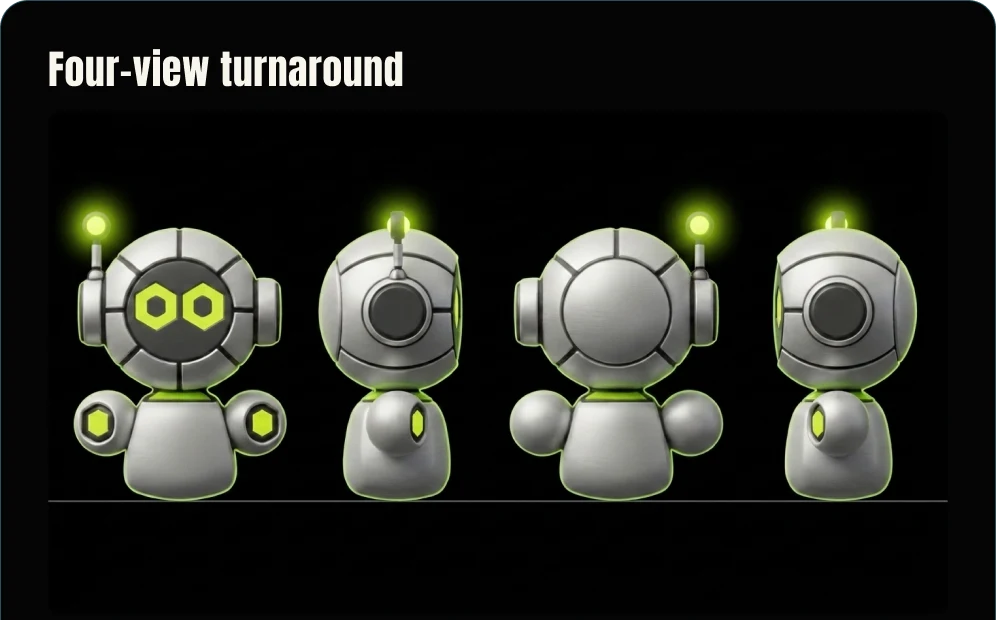
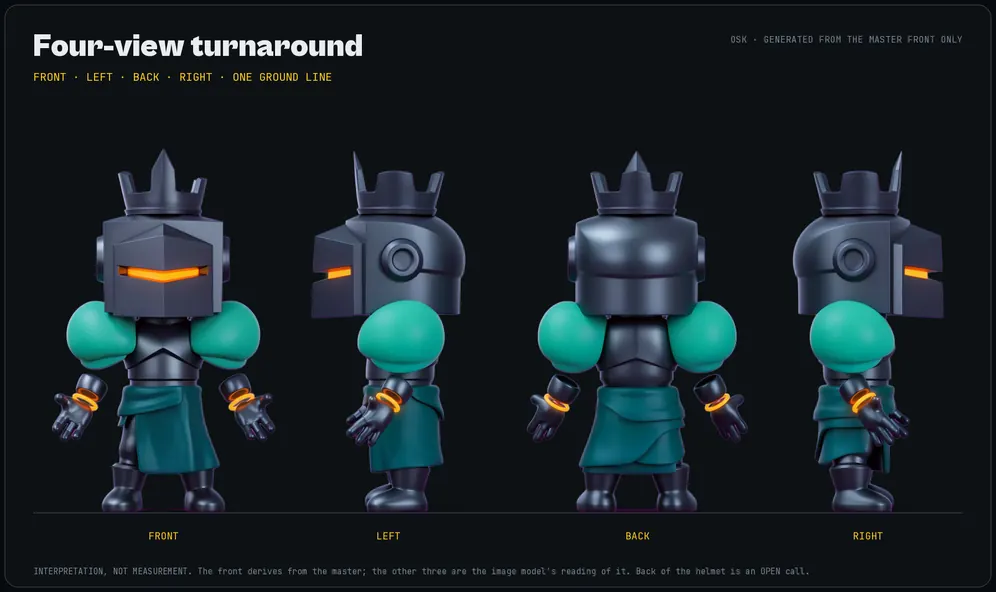
Front, left, back and right, standing on one ground line. The front derives from the master. The other three are the image model’s interpretation, so treat them as art direction, not measurement.
You’ll reach for this the first time a design turns your character three-quarter and you have to decide whether it’s still on-model.
3. The dimensioned orthographic
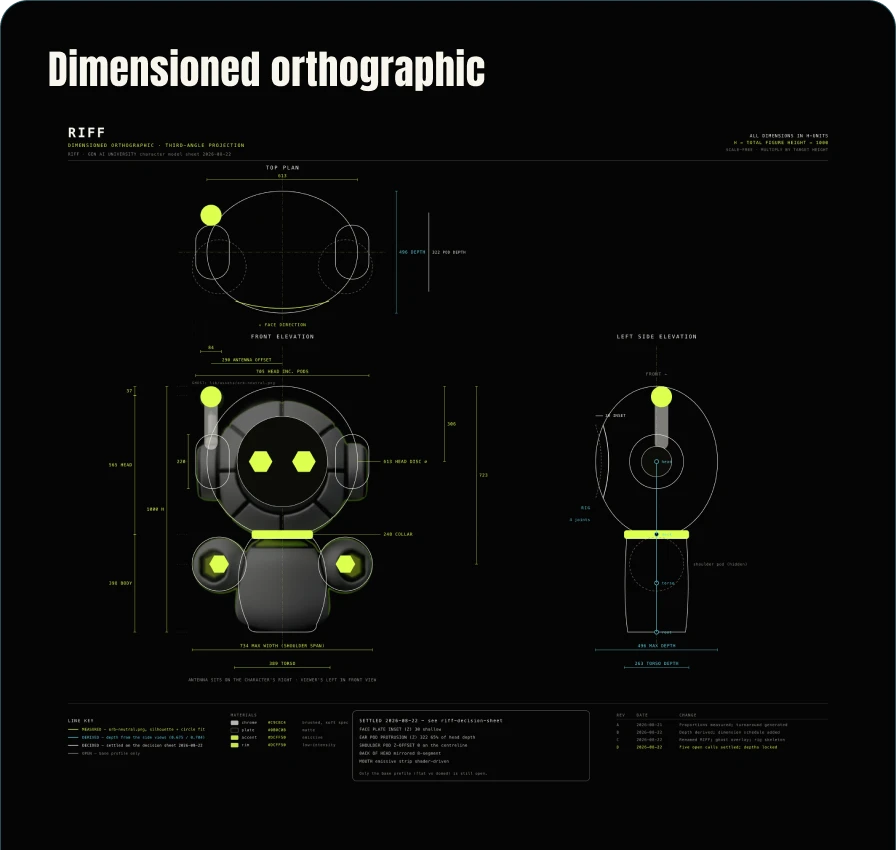
A plan view over the front view, with the side view to the right, every dimension labeled. This one is drawn from measured numbers, never generated. Claude Code measured the master front and drew the plate as code. It isn’t a picture of the character; it’s the character’s geometry.
Every number on it carries a trust tier, and this is the habit worth stealing:
- Measured: taken off the real master image. Safe to build against.
- Derived: reasoned from generated views. Consistent, but nobody observed it.
- Decided: a design call you made and dated (see the decision sheet).
- Open: still unresolved. Never invent a value; settle it on purpose.
RIFF’s sheet has exactly one open item left, the shape of his base. Everything else is labeled with how far you can trust it, so nobody mistakes a guess for a fact.
This is the plate that settles arguments. When a result looks “a bit off”, this plate tells you exactly what’s off: the head is too small for the body, the ear pods are too deep, the antenna moved.
4. Expressions and size proof
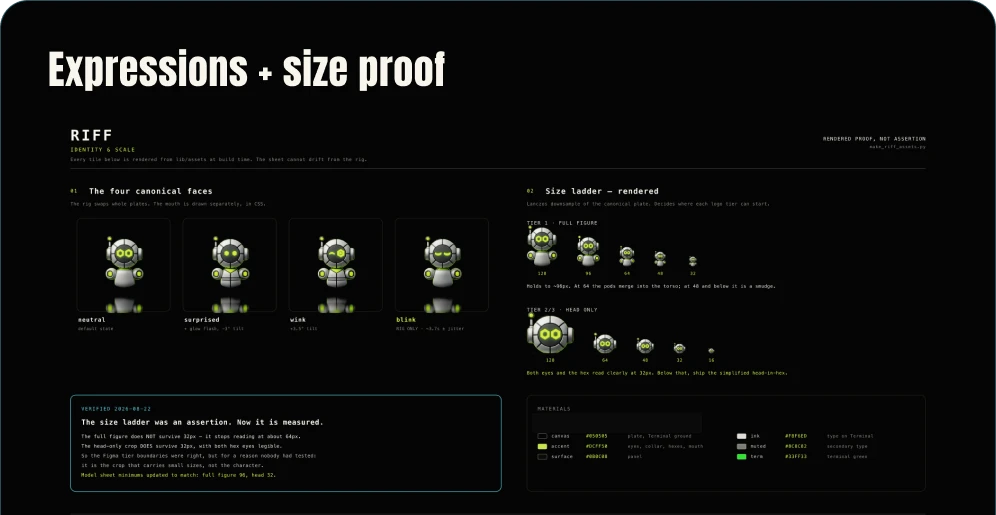
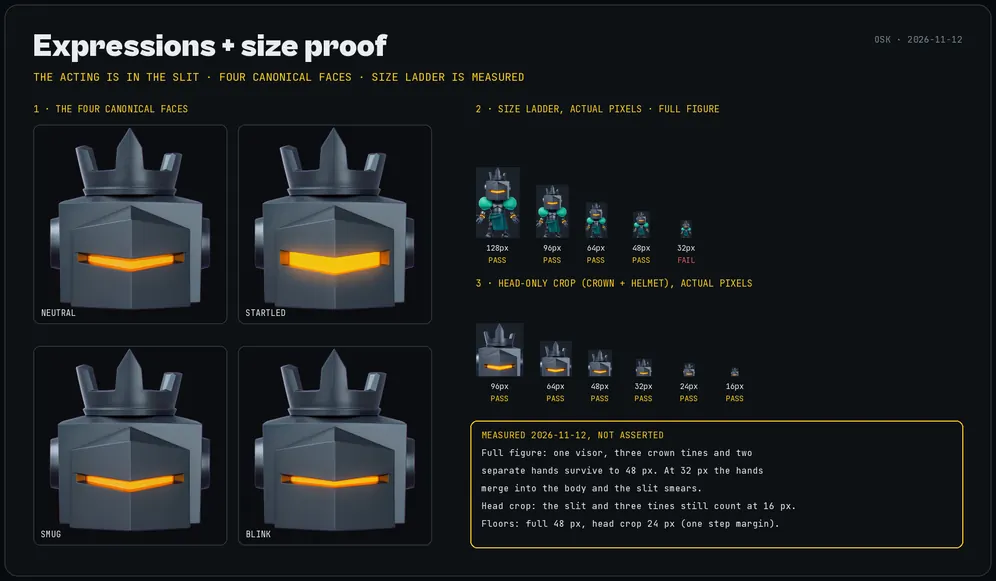
RIFF acts with his eyes first. His mouth is a thin lime light strip that only animates when he talks, so on still art like merch it stays off and the eyes carry everything. The sheet fixes four canonical faces (neutral, surprised, wink and blink) so a sticker sheet never invents a fifth.
The right side is the size ladder: the master front shrunk step by step, to see where he stops reading. That ladder is where the size floors come from.
5. The decision sheet
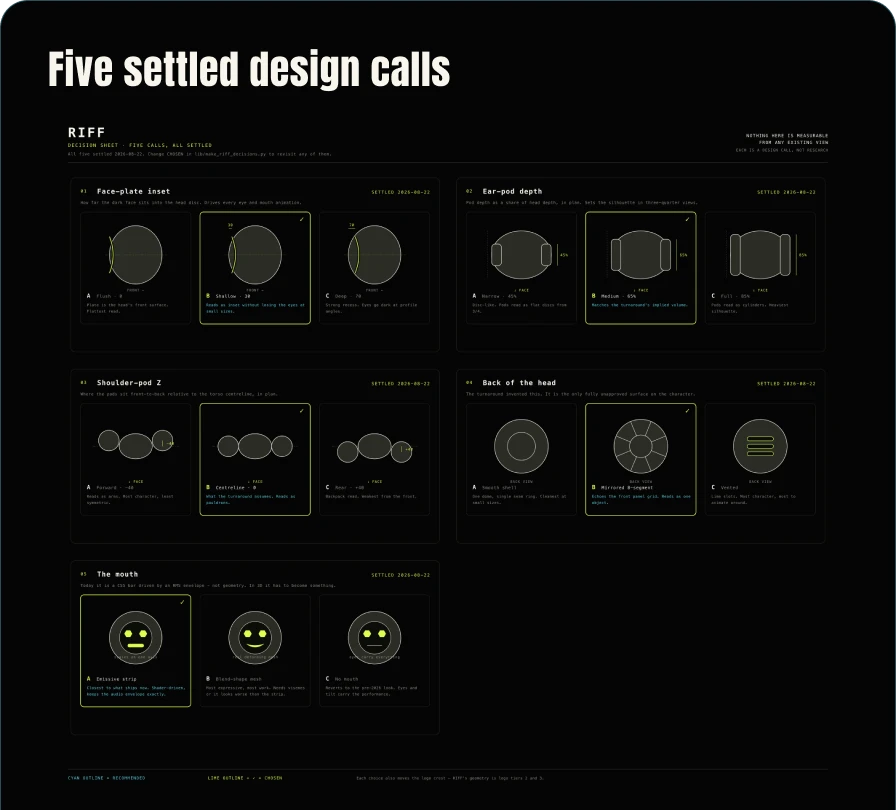
Every character has ambiguous details that keep coming back up. For RIFF there were five: how deep the face plate sits, how far the ear pods stick out, where the shoulder pods sit, what the back of the head looks like, and what the mouth is.
Each one got three options drawn side by side, one pick, and a date. Once a call is settled it stays settled, and nobody, human or AI, reopens it by accident.
6. Key dimensions
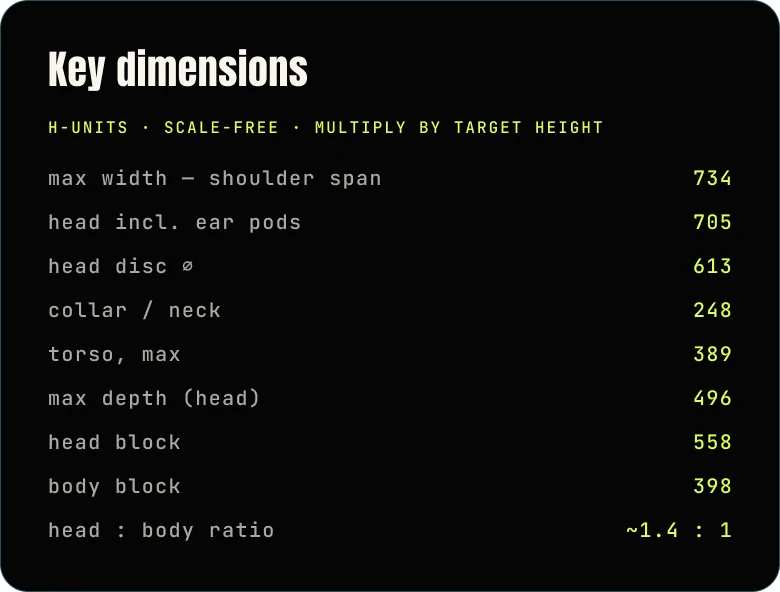
The orthographic’s numbers in scale-free units. Multiply by any target height and the proportions hold. The one number worth memorizing is the head-to-body ratio: about 1.4 to 1 for RIFF. When a model squashes or stretches your character, that ratio is usually what broke.
7. Size floors
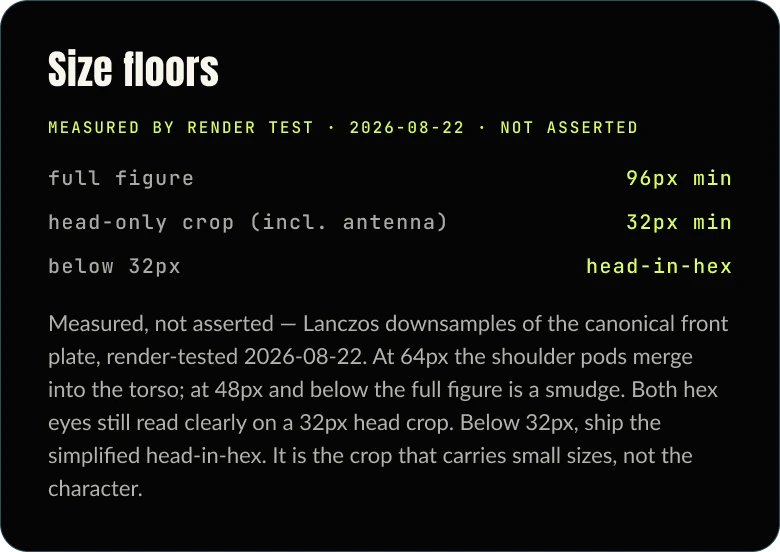
The smallest size each crop survives, measured by an actual downsample test, not asserted. RIFF’s full figure stops reading below about 96 pixels; at 64 px the shoulder pods merge into the torso. The head-only crop still reads at 32 px, with both hex eyes visible. Below that, you ship a simplified mark.
The lesson cost us a wrong assumption: we’d guessed the full figure would survive 32 px. It doesn’t. It’s the crop that carries small sizes, not the character. That’s exactly why the hat in the video uses a flat head-in-hex badge instead of the full chrome RIFF.
The character block: RIFF’s real prompt
Everything above turns into one paragraph that goes at the top of every image prompt. We call it the character block. This is RIFF’s, exactly as we use it:
RIFF, a small friendly robot mascot. Large brushed-chrome sphere head made of
segmented panels like a football, with an inset round matte-black face plate.
Two glowing electric-lime (#DCFF50) hexagon-outline eyes side by side. A thin
glowing lime emissive strip for a mouth. Short chrome antenna on the top-left
with a glowing lime bulb. Round chrome ear pods with dark centers on both sides
of the head. A thin lime glow ring at the collar. Small rounded chrome
bell-shaped body with no legs. Two floating chrome sphere hands beside the
body, each with a small glowing lime hexagon inset. Head about 1.4 times the
size of the body. Clean premium 3D render, soft studio light from the
top-left, subtle reflection floor. Lime is only ever light, never paint.
And the negative list that goes at the end:
No arms, no legs, no fingers, no human face, no eyebrows, no round eyes,
no two-tone paint, no colored body panels, no text, no logos, no watermark.
Every prompt is then the same three parts: character block + one shot line + one format line. When the reference is attached, the shot line stays short and only describes what changes. The rules that keep it working:
- Attach the locked reference every time, and never an earlier output. Copies of copies drift. A result from yesterday is already a little off-model, and using it as today’s reference bakes the drift in.
- Generate on flat magenta (#FF00FF), not black, when you plan to cut the background out. Background removal can’t tell a near-black face plate from a black background, and it will eat part of your character.
- Mark every output PASS or FAIL against the rules. If the same shot fails three times, stop and change the prompt or the reference instead of rolling the dice a fourth time.
- Download your keepers right away. Generated image links don’t last forever.
The one prompt that builds your spec
Paste this into Claude Code in an empty folder, with your one character image saved in it. It works through the spec with you one phase at a time and asks before every file and every image-generation call.
You are my character designer and spec keeper. Together we will build a
character spec for my mascot: a short set of rules plus seven reference
plates, so that every AI-generated design stays on-model.

Work one phase at a time. At the end of each phase, show me what you made
and wait for my "go" before the next one. Confirm before writing any file.
Never overwrite or edit my original image. Before any image-generation call,
tell me what you will generate and how many, and wait for my go.

PHASE 0: READ AND INTERVIEW
Look at my character image. Describe back to me, in plain words, what you
see: overall shape, head-to-body ratio, eyes, mouth, limbs, materials,
colors, any accessories. Then ask me, one question at a time:
1. The character's name, and what it is (mascot for what brand or project).
2. Its personality in three words.
3. Which details must NEVER change (identity), and which can flex (pose,
   setting, outfit, product).
4. Where its colors live. Which color is "the glow" or accent, and where is
   it allowed to appear?
5. Anything it must never have or do (e.g. no legs, no mouth, never angry).
6. Where it will be used: apparel, stickers, hats, posters, avatars, other.
Wait for each answer before asking the next.

PHASE 1: THE RULES
Write SPEC.md with:
- Identity: name, one-line description, personality.
- THE RULES: no more than four, each short enough to say out loud in under
  two seconds (example: "Two hex eyes. Antenna on the viewer's left. Lime
  only where he glows. No legs."). These are the on-model check.
- Fixed vs flexible: two lists.
- Palette: each color as a hex value, with exactly where it is allowed.
- Never list.
- THE CHARACTER BLOCK: one paragraph pasted at the top of every image
  prompt. Concrete nouns, counts and sides only ("TWO hexagon eyes", "antenna
  on the top-left"), the head-to-body ratio, the material and lighting, and
  the color rule in one sentence. No mood words.
- THE NEGATIVE LIST: one line of things that must never appear (extra limbs,
  wrong eye shapes, text, logos, watermarks).
- The prompt formula: CHARACTER BLOCK + one shot line + one format line.
Show me SPEC.md and wait.

PHASE 2: THE MASTER FRONT
Decide with me whether my image is good enough to be the master front:
front-on, evenly lit, plain background, no text, every rule visible. If it
is not, write a cleanup prompt for an image model that uses my image as the
reference and the CHARACTER BLOCK from SPEC.md, and asks for: front
view, centered, plain dark or plain light background, no text, no props.
Generate only after my go. When I pick one, save it as
plates/01_master_front.png. From here on it is the only reference we use,
and nobody edits it.

PHASE 3: TURNAROUND AND EXPRESSIONS
Using ONLY the master front as the reference (never an earlier output),
built as CHARACTER BLOCK + shot line + format line + NEGATIVE LIST, on a
flat #FF00FF background, write prompts for:
- a four-view turnaround (front, left, back, right) on one shared ground
  line, plain background, no text;
- the canonical expressions (three or four faces that fit the personality),
  same body in every one.
After my go, generate, show me the options, and check each one against
THE RULES out loud, marking it PASS or FAIL with the reason. If the same
shot fails three times, stop and propose a prompt or reference change
instead of generating again. Save my picks
as plates/02_turnaround.png and plates/04_expressions.png. Note in SPEC.md
that the turnaround is interpretation, not measurement.

PHASE 4: MEASURE, DON'T GUESS
Measure the master front from its pixels: the bounding box of the whole
figure and of each major part (head, body, limbs or pods, accessories).
Convert to scale-free units where the full height = 1000. Write the key
dimensions table into SPEC.md, including the head-to-body ratio. Give every
number a trust tier: MEASURED (off the master image), DERIVED (reasoned
from generated views), DECIDED (a dated design call) or OPEN (unresolved;
never invent a value for an open item).
Then draw, as code (SVG or HTML rendered to PNG), never generated:
- plates/03_orthographic.png: front view outline with the measured
  dimensions labeled, plus a side view if the turnaround supports one;
- plates/06_key_dimensions.png: the dimensions table as a clean plate.
Show me both and ask whether anything looks wrong.

PHASE 5: THE DECISION SHEET
List every detail that is still ambiguous (things the master front does
not show clearly, or that generations keep getting different). For each,
draw or generate three options side by side. I pick one; you record the
pick and today's date in SPEC.md under "Settled calls" and build
plates/05_decision_sheet.png. A settled call is never reopened without me.

PHASE 6: SIZE FLOORS (TEST, DON'T ASSERT)
Downsample the master front with Lanczos to 256, 128, 96, 64, 48 and 32 px
tall, both the full figure and a head-only crop. Put them side by side in
plates/07_size_floors.png. For each size, check THE RULES: can you still
see each one? Report the smallest size where the full figure still passes
and where the head crop still passes. Write those floors into SPEC.md. If
the head fails at 32 px, propose a simplified mark for tiny sizes (flat
colors, head only, inside a simple shape) and draft it with me.

PHASE 7: THE PRODUCT PACK
Write PRODUCTS.md with:
- The reference rule: upload only plates/01_master_front.png as a
  reference. Never upload the sheets; the model copies their lines and text.
- One ready-to-paste design prompt per product I named in Phase 0, each
  built from the CHARACTER BLOCK, with exact text in quotes if any.
- A flat-color version note for embroidery and tiny sizes (three colors,
  no gradients, no glow, thick shapes that read at 2 inches).
- The on-model check, written as a four-line checklist.
- Print-ready check: after removing the background or preparing for print
  (both done in POD Studio), zoom in on any small text before sending the file to a print-on-demand
  shop. Small text on dark backgrounds is the first thing to break.

FINISH
Give me a one-screen summary: the folder tree, THE RULES, the size floors,
and the first product prompt to try. Then stop.
Make the prompt yours
Fill in what you already know about your character and the prompt above updates as you type. Your answers go in a short “About my character” preamble at the top, which answers Phase 0 for you. The rest of the prompt stays exactly as written. Everything runs in your browser and nothing is sent anywhere.
Your prompt, live
From spec to print-ready file in POD Studio
This is the section that matches the video. The spec does its job the moment you start designing. In POD Studio:
1. Load the master front as a reference, not a starting image. In Create Design, go to References, then + Add, then Upload, and pick your master front. POD Studio also has a Starting image slot. That one is for remixing a template. For a mascot, the reference is what keeps the character consistent.
2. Upload only the clean master. It’s tempting to upload the orthographic or the dimensions plate too. Don’t. The model copies those measurement lines and labels straight into your design.
3. Describe it and generate. The character block from your SPEC.md goes first, then the product and any exact text in quotes. Here’s the tee prompt that worked for RIFF on the first run:
Centered t-shirt print on black: RIFF, the Gen AI University mascot from the
reference, a compact brushed-silver chrome robot, front view. Large round
segmented chrome head about 1.4x the body, dark smoked-glass face plate with
exactly TWO glowing electric-lime (#DCFF50) hexagon outline eyes, no mouth.
One antenna on the viewer's left with a glowing lime bulb. Chrome ear pods,
thin lime collar ring, short bell-shaped chrome body, no arms, no legs, two
floating chrome hand-pods with lime hexagon insets. Soft lime glow pooling
beneath him like a reflection. Below him the text "GEN AI UNIVERSITY" in
tall condensed bold white capitals. Lime only where he glows. No other text.
Notice what it does: it’s the character block adapted for a print, with counts (“exactly TWO”), sides (“on the viewer’s left”), the ratio from the key dimensions (“about 1.4x the body”) and the color rule, word for word. On still merch the mouth strip is left off, which is why this one says “no mouth”.
4. Check every result out loud. Four rules, five seconds per image. In RIFF’s runs, most results passed. The misses were specific and easy to name: one turned his head three-quarter, one doubled the eyes, and one lost the hexagons on his hand-pods. Naming the miss is how you pick the right one.
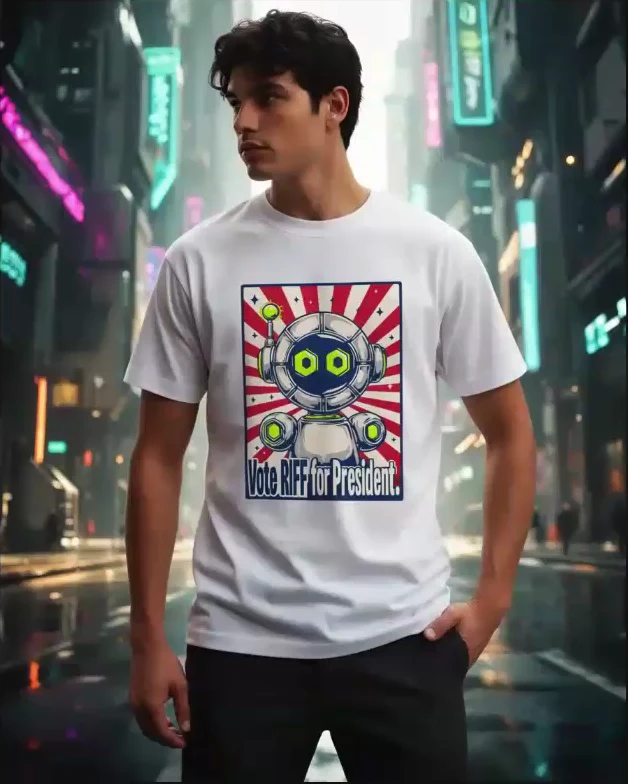
5. Refine with Edit, one change at a time. Don’t start over when a design is close. Use Precise Edit on the one you like and describe a single change. In the video, “center RIFF looking directly at me, and capitalize President” fixed both on the first try, and everything else stayed the same.
6. Remove the background and upscale. Once the design is right, take the background out and upscale it. Generate on flat magenta if you plan to cut the background out (see the character block above).
7. Put it on a product with Product mockup. The mockup templates show the design on a tee, hat, sticker sheet or poster, so you can see it in the real world and get feedback before anything is made.
8. Prepare for Print. Choose the print size for the product’s print area and POD Studio prepares the file at 300 PPI.
9. Hand off to a print-on-demand shop. POD Studio takes you from concept to a print-ready file. It doesn’t print or ship, so the file goes to a shop like Printful.
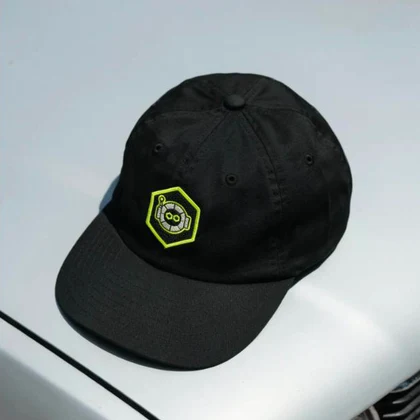
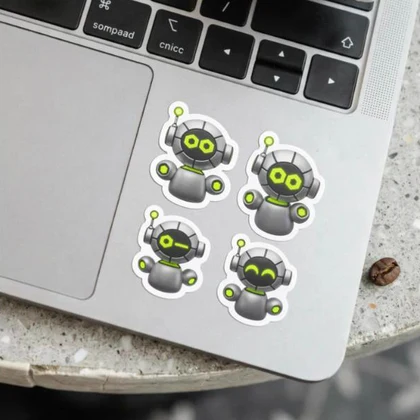
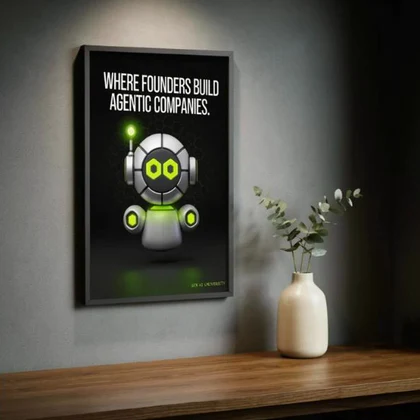
The same spec on four products, as mockups from POD Studio: the hat is the flat head-in-hex mark from the size floors, the stickers are the four canonical faces, and the tee and poster use the master’s description.
And the one I made live in the video. Starting from the same master front, I generated a presidential-poster design, fixed it with one Precise Edit (center RIFF, capitalize “President”), then put it on a tee and a hoodie in a neon city scene:
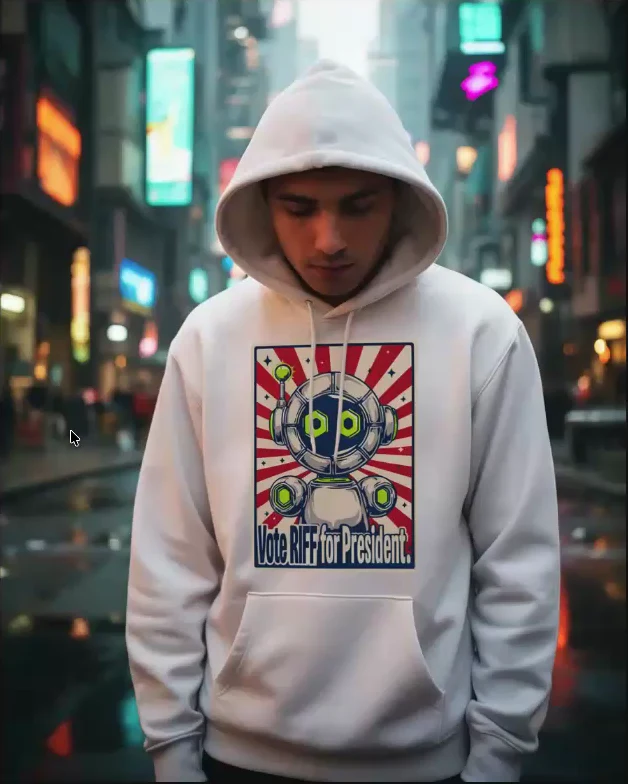
A completely different art style, and he’s still RIFF: two hex eyes, antenna on the left, lime only where he glows. That’s the spec doing its job.
The one catch worth knowing: after Remove Background or Prepare for Print, zoom in on any small text. On RIFF’s tee, a small lime tagline on black got partly eaten when the background came out. The fix is to make small text bigger, or keep a solid background behind it, then prepare it again.
Same process, new character
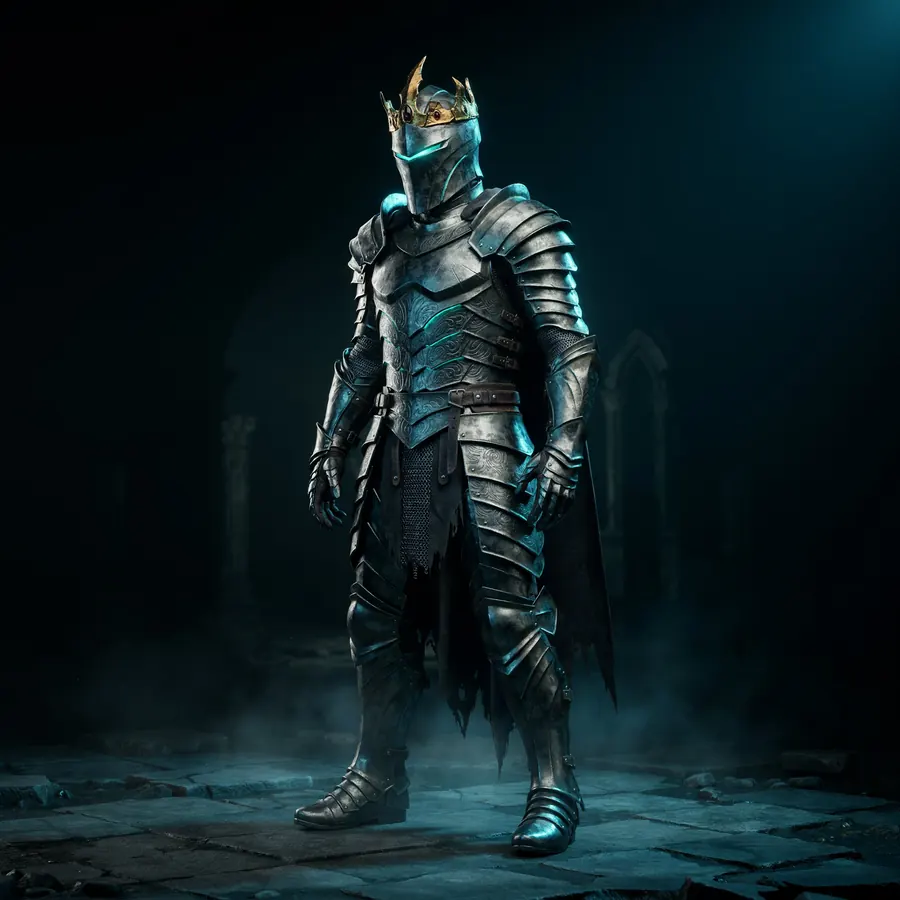
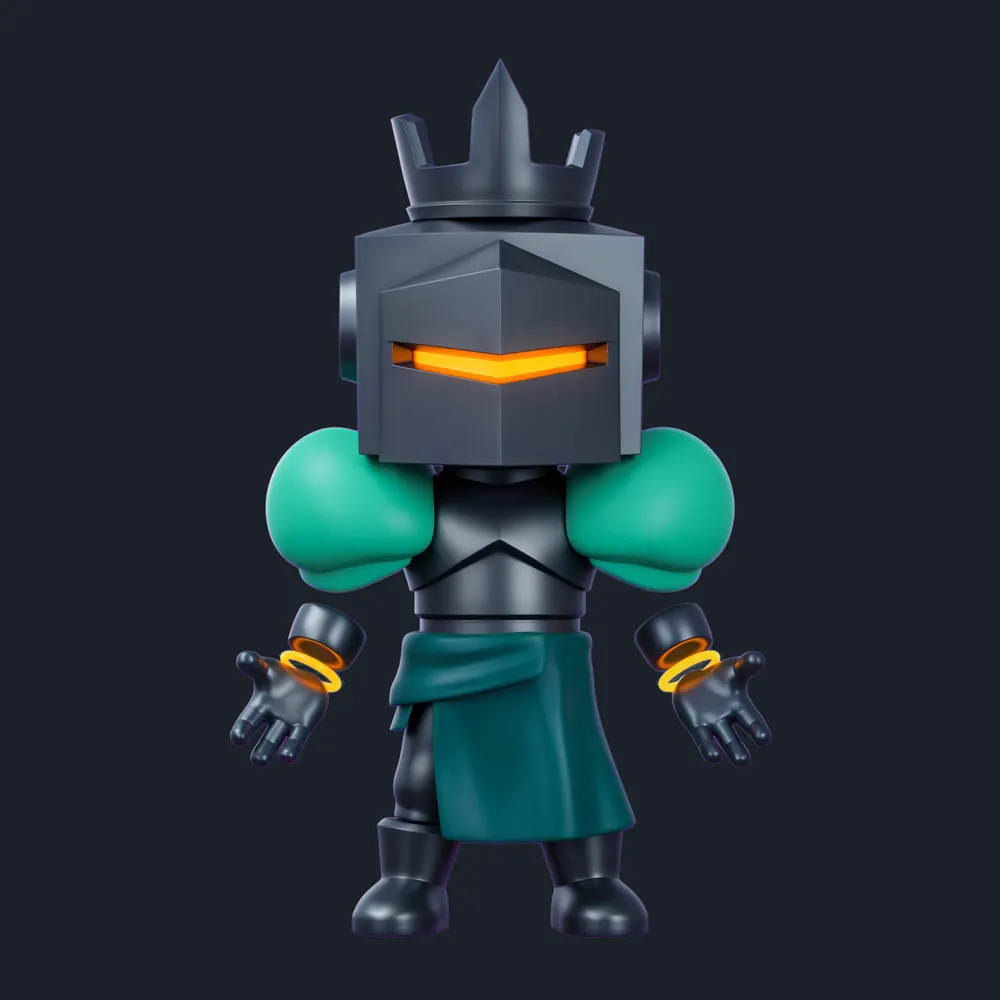
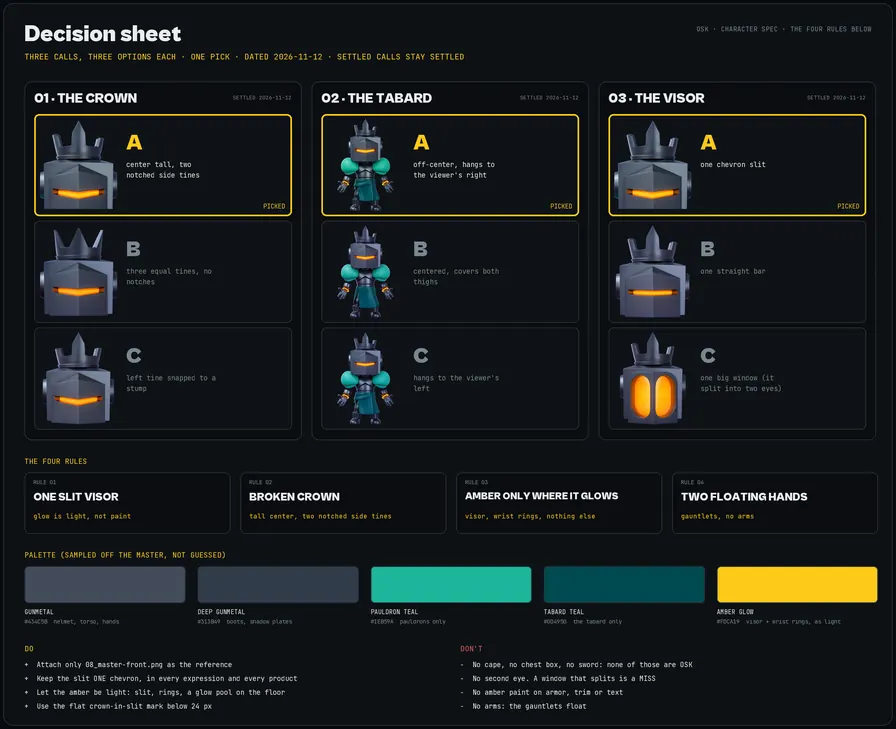
RIFF is a friendly chrome robot, so a fair question is whether this only works for a character like him. I ran the same prompt, in the same order, on someone very different. Meet OSK, an original armored villain made up for this test: a compact gunmetal commander with a broken crown, oversized teal pauldrons and one amber slit for a face. Claude ran the character spec prompt from this page as written, phase by phase, and logged every call it made. One image in, seven plates and four rules out, then merch.
OSK’s four rules, written the same way as RIFF’s:
The content changed: RIFF’s rules are about eyes and an antenna, OSK’s are about one slit and a crown. The shape stayed. Four rules, each one a count or a side, each one you can say in two seconds.
Here is the whole run next to RIFF’s, step by step. Read it side by side, or flip to one character at a time.
1First draft One image, however rough
2Master front The one reference
3Turnaround Front, side, back, other side
4Expressions and size proof Faces, then how small it can go
5Decision sheet Three options, one pick
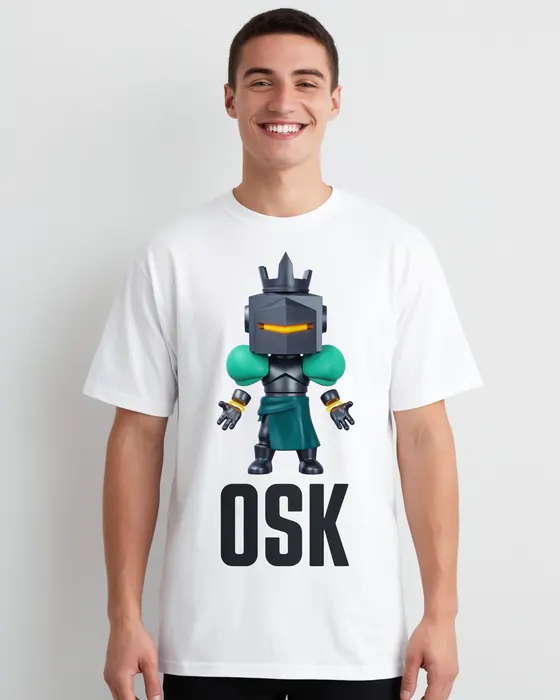
6Merch A tee, same method
What the run taught us
- Measure, don’t guess. The first character block said “head about 1.3 times the body” and used hex codes typed from memory. Then Claude measured the master. The helmet alone is about half the body below it, the head with its crown is about 0.87 to 1, and the real amber is #FDCA19, not the one that was typed. The block was rewritten from the numbers, and the plates were drawn from pixels, not from opinion.
- Remove Background ate a hand. Ideogram’s Remove Background quietly deleted one floating gauntlet. Floating parts are exactly what background removal eats. The fix is the one this guide already teaches: regenerate on flat magenta and key it out in code. The transparent master came from that version.
- The model won’t always give you your idea. The prompt asked for a crown with one tine snapped off, and the model gave notches every time. So the notched crown became canon and rule 2 was rewritten to match what the master really shows. When the model won’t do your idea, change the image or change the rule, and write down which one you did.
- Small sizes are specific to the character. OSK’s full figure holds to 48 px where RIFF needed 96, and at 32 px his hands merge into his body. Big flat shapes survive small sizes.
The merch, and the miss. Four products, each from the master front as the only reference. Tee, hat and poster passed. The first sticker sheet missed: the startled sticker grew a second eye, which breaks rule 1, and the crown drifted on another. One regeneration with firmer wording fixed it, and that was the only retry allowed.
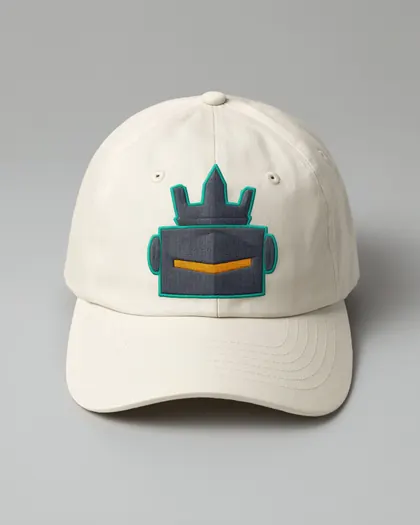
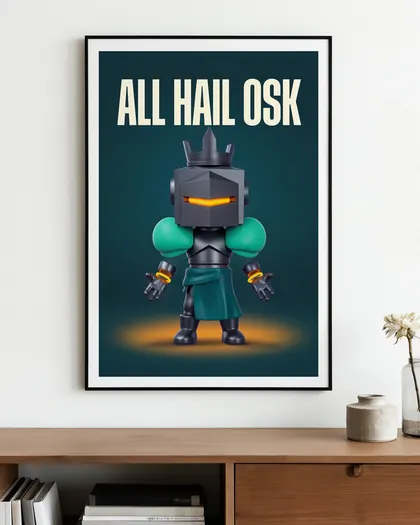
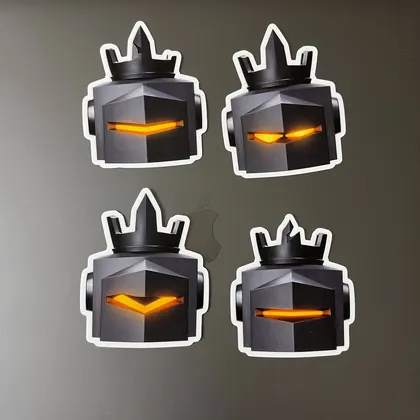
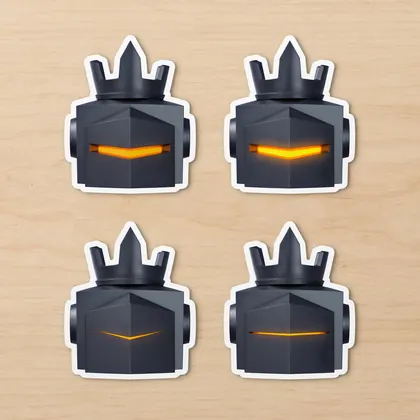
Rule 1 caught it. Without a check you can say out loud, a two-eyed OSK on a sticker sheet looks fine. With one, it is a clear fail.
Two routes made OSK’s merch, and the labels say which is which. The images above are mockup-style images generated through Ideogram’s MCP, with the master front as the reference. They are a fast way to check a design on a product, and that is all they are.
Then OSK went through POD Studio itself, the way RIFF’s merch did in the video. Product mockup templates and Prepare for Print are part of the POD Studio web app, not the MCP, so Claude worked in the web app in my browser. It uploaded the transparent master front, ran Product mockup on an official T-shirt template, then ran Prepare for Print on a 15 x 18 in tee print area.
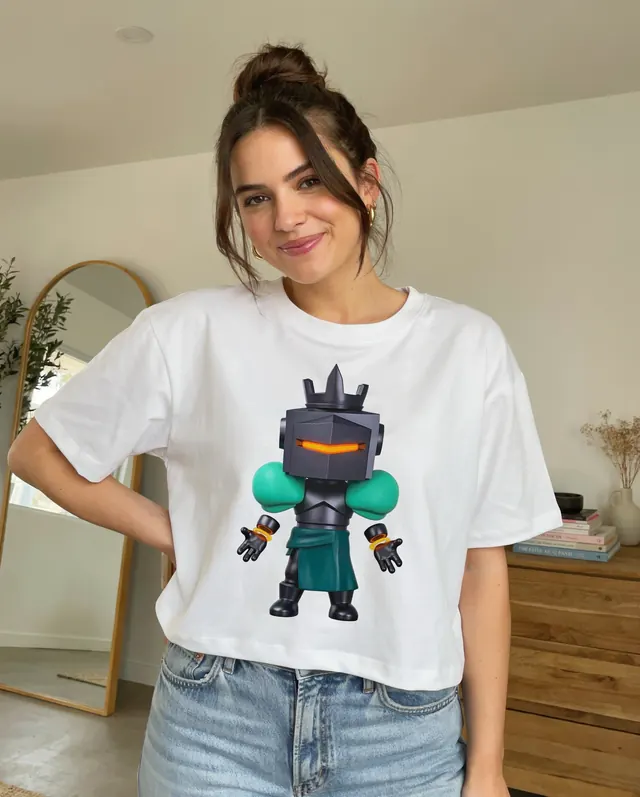
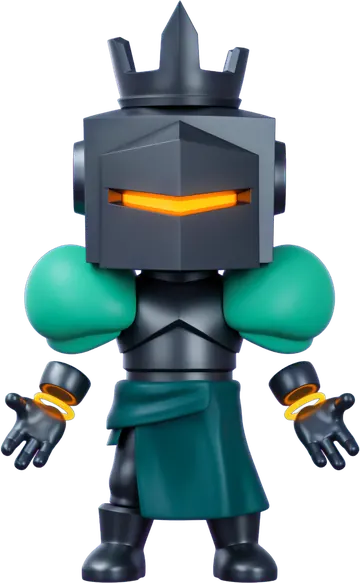
Upload the transparent master, not one on a colored background, or the color comes along onto the shirt. If it works for a gunmetal knight with no mouth, it works for yours, and the builder above gets you started.
Let your AI draft the next round
Once the spec exists as files, your AI can use it the same way you do.
There are two ways your AI can work in Ideogram, and you can use both.
- Through Ideogram’s MCP. Ideogram has an official MCP server, so Claude can generate and edit images in your account directly, using your master front as the reference. It can also remove backgrounds, upscale, vectorize and make 360 product spins, and it saves everything to your account.
- In your browser, inside POD Studio. Claude can also work in the POD Studio web app the way you do, for the tools the MCP doesn’t reach yet: the Product mockup templates and Prepare for Print.
The morning I filmed, Claude ran RIFF’s merch line inside POD Studio from my browser: the tee, the sticker sheet, the dad hat and the poster, each on a mockup, then Remove BG and Prepare for Print. It made one miss (it put the tee design on the model’s phone), fixed it with one line, and caught the same small-text problem I show in the video.
As Ideogram adds more of POD Studio to the MCP, more of this moves into a single prompt. Either way the spec does the same job: it’s what keeps every result on-model.
If you haven’t connected it yet, step 2 of the setup takes two minutes.
With the spec in a folder, point Claude at it:
Read SPEC.md and PRODUCTS.md in this folder. Use plates/01_master_front.png
as the only reference. Give me five merch ideas that stay on-model, as
POD Studio prompts. For each one, tell me which of THE RULES is most at
risk on that product and how the prompt protects it. Don't generate
anything until I pick. Mockups and print prep happen in POD Studio
after I pick.
It’s like having a merch designer on the team who has read the spec and never gets tired of the four rules. You still pick, and you still approve anything that ships.
Make it yours, then show me
Build your own spec from this page, run one product through it, and share the before and after wherever you found this link. I want to see which four rules you land on, and which product proves they hold.
FAQ
Do I need Claude Code? For the full spec, it’s the best fit, because it measures images, draws plates as code and keeps the files organized. You can run most of the prompt in Claude or ChatGPT by uploading your image. You’ll just do the measuring and file saving yourself.
Do I need Ideogram? No. The spec method works with any image model that accepts a reference image. I use Ideogram’s POD Studio because it keeps design, refinement, mockups and print prep in one workspace, and because it gets text right on merch.
I only have a rough sketch of my character. Is that enough? Yes. RIFF started as a clunky first image. Phase 2 of the prompt turns your best image into a clean master front before anything else gets built.
Why not upload all seven plates as references? Because the model copies what it sees. Measurement lines, labels and grids end up in your design. The other six plates are for you and your AI to check against; only the master front goes to the image model.
How many rules should my character have? Four or fewer. If you can’t say them in five seconds, you won’t check them on every image, and a rule you don’t check isn’t a rule.
Does this work for a human character or a brand illustration? The structure does: master front, rules, turnaround, expressions, decisions, dimensions, size floors. The rules change (for a person, things like hair shape, signature colors and a defining accessory), but the method is the same.
Can Claude make the mockups too? Not through the Ideogram MCP. Claude can generate and edit designs, remove backgrounds, upscale, vectorize and make 360 spins. Product mockup templates and Prepare for Print live in the POD Studio web app, so either you run them, or Claude runs them for you in your browser. That’s how RIFF’s mockups were made.
Can I sell merch made this way? That depends on your print-on-demand shop’s terms and the image model’s terms of use. Check both for commercial use before you list anything.
Sources
Ideogram: POD Studio and the official Ideogram MCP, the source of truth for setup and supported clients.
Anthropic: Claude Code documentation, for install and claude mcp add.
Our own field results. The four rules, the plates and the size floors come from building and running RIFF’s spec. The misses quoted above (the turned head, the doubled eyes, the lost hand-pod hexes and the eaten tagline) are from real runs on November 12, 2026, recorded for the video this page goes with. The OSK case study is a real run of the same prompt, also on November 12, 2026, including its misses.